Learning how to install eSIM on iPhone is one of the easiest ways to prepare your phone before an international trip.
Instead of buying a physical SIM card at the airport, waiting in line, or paying expensive roaming fees, you can install a digital eSIM directly on your iPhone and use mobile data when you travel.
This is especially helpful if you are visiting Europe, Dubai, the USA, France, Spain, Turkey, Japan, Thailand, Morocco, or several countries in one trip.
With Jet eSIM, travelers can choose an international eSIM plan, install it digitally, and stay connected without removing their regular SIM card.
This guide explains how to install eSIM on iPhone step by step, what to check before setup, and how to avoid common activation problems.
What Is an iPhone eSIM?
An iPhone eSIM is a digital SIM that lets your iPhone connect to a mobile data plan without using a physical SIM card.
Instead of inserting a plastic SIM, you add the plan through your iPhone settings, a QR code, or supported digital activation method.
For travelers, this is very useful because you can keep your main SIM active for your regular number while using your eSIM for travel data.
That means you can still receive calls, texts, banking alerts, and WhatsApp messages on your normal number, while your travel eSIM handles mobile internet abroad.
This is why many travelers now prefer an iPhone eSIM over a traditional travel SIM card.
Why Install an eSIM Before You Travel?
It is usually better to install your eSIM before you travel because you will have stable Wi-Fi, enough time, and less pressure.
Trying to set up mobile data after landing can be stressful, especially if you are tired, in a busy airport, or need internet immediately for transport and hotel directions.
When you install your eSIM before departure, your phone is already prepared.
You can land, turn on the correct settings, and connect according to the plan’s activation rules.
Jet eSIM makes this easier by offering international eSIM plans for popular travel destinations, so you can choose your plan before your trip starts.
Before You Install eSIM on iPhone
Before learning how to install eSIM on iPhone, you should check three important things.
First, make sure your iPhone supports eSIM.
Most newer iPhone models support eSIM, but compatibility can vary by model, region, and carrier restrictions.
Second, make sure your iPhone is unlocked.
If your phone is locked to one carrier, it may not accept another mobile plan. This is one of the most common reasons an eSIM does not install properly.
Third, connect your iPhone to Wi-Fi before setup.
You usually need an internet connection to install the eSIM profile on your device.
Buy Your Jet eSIM Plan
The first step is to choose the right travel eSIM plan for your destination.
Visit Jet eSIM and select the destination or region you need.
For example, you may need an eSIM for Europe, eSIM for Dubai, eSIM for USA, eSIM for France, eSIM for Spain, eSIM for Turkey, eSIM for Japan, eSIM for Thailand, or eSIM for Morocco.
Choose a plan based on your travel dates, data needs, and destination coverage.
Once your order is complete, you will receive the eSIM details needed for installation, usually including a QR code.
Keep the QR code ready before you start the setup process.
How to Install eSIM on iPhone With QR Code
The most common way to install a travel eSIM is by scanning a QR code.
This method is simple, but it works best when the QR code is shown on another device or printed.
For example, you can open the QR code on your laptop, tablet, or another phone, then scan it with your iPhone.
Step 1: Open iPhone Settings
Start by opening the Settings app on your iPhone.
Depending on your region, the menu may say “Cellular” or “Mobile Data.”
Tap that option to open your mobile network settings.
This is where your iPhone manages physical SIMs, eSIMs, mobile data lines, and roaming settings.
Step 2: Tap Add eSIM
Inside the Cellular or Mobile Data section, look for the option that says “Add eSIM.”
Tap it to begin adding your new Jet eSIM plan.
Your iPhone may show a few setup options depending on your iOS version and device model.
For most travel eSIM users, the QR code option is the easiest method.
Step 3: Scan Your Jet eSIM QR Code
Choose the QR code option and scan the Jet eSIM QR code you received after purchase.
Make sure the QR code is clear and fully visible on the other screen.
Hold your iPhone steady while scanning.
Once the QR code is detected, your iPhone should recognize the mobile plan and begin the installation process.
Step 4: Follow the On-Screen Instructions
After scanning the QR code, your iPhone will guide you through the remaining setup screens.
Tap Continue when asked.
Then tap Add Cellular Plan or Add Mobile Plan, depending on the wording on your device.
Your iPhone may take a short time to add the eSIM.
Do not close Settings while the plan is being added.
Once the eSIM appears in your mobile data settings, the installation is complete.
Step 5: Label Your eSIM
Your iPhone may ask you to label your new eSIM line.
You can label it as “Travel,” “Jet eSIM,” “Dubai,” “Europe,” or any name that makes sense for your trip.
This is helpful because many iPhones can store more than one eSIM.
A clear label helps you avoid confusion between your main SIM and your travel eSIM.
For example, if your regular SIM is used for calls and texts, and Jet eSIM is used for travel data, naming the line properly makes setup easier.
Step 6: Choose Your Default Line
Your iPhone may ask which line you want to use as your default line.
For most travelers, it is best to keep your regular SIM as the default line for calls and messages.
Then use Jet eSIM for mobile data while traveling.
This lets you keep your normal number active while using affordable international data through your eSIM.
It is one of the biggest benefits of using a Travel eSIM on iPhone.
Step 7: Select Jet eSIM for Mobile Data
After installation, go back to Cellular or Mobile Data settings.
Find the Mobile Data option and select your Jet eSIM line for data.
This tells your iPhone to use Jet eSIM for internet access instead of your home carrier.
You can still keep your main SIM active for calls and texts if your phone supports dual SIM use.
This setup is ideal for international travel because it helps you avoid using your home carrier’s roaming data by mistake.
Step 8: Turn On Data Roaming for the eSIM Line
For many travel eSIMs, data roaming must be turned on for the eSIM line to work abroad.
This does not mean you are using your home carrier’s expensive roaming.
It simply allows your travel eSIM to connect to supported networks in your destination.
Make sure you turn on data roaming only for the Jet eSIM line, not your regular home SIM, unless you intentionally want to use roaming on your main number.
This step is important because some users install the eSIM correctly but forget to turn on roaming for the eSIM line.
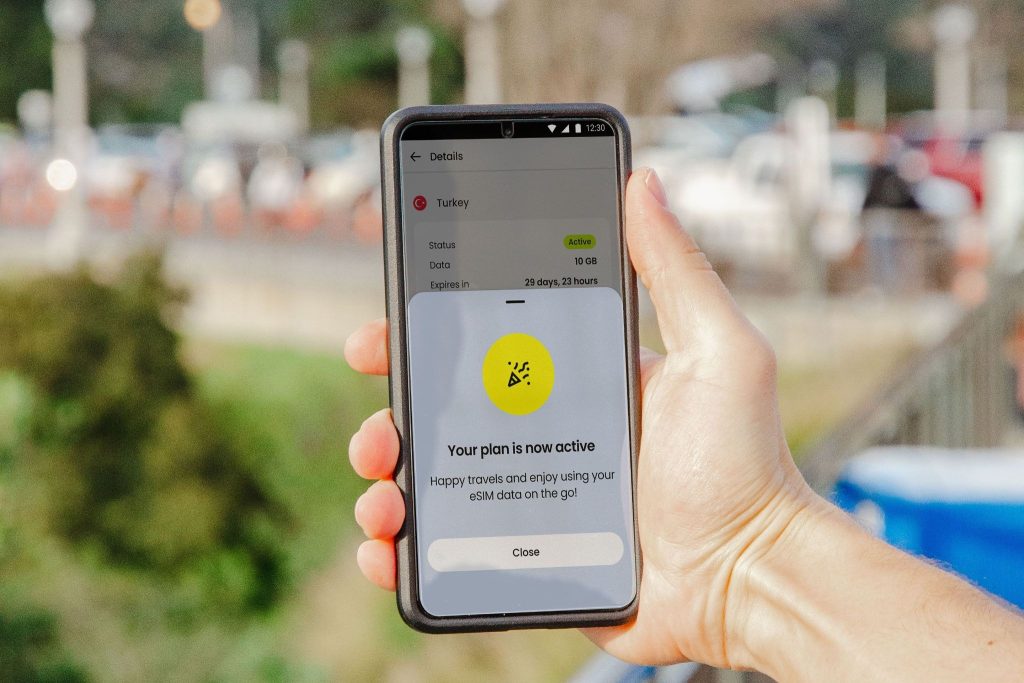
Step 9: Activate the eSIM at the Right Time
Some eSIM plans activate when installed.
Others activate when they first connect to a supported network in the destination country.
Before installing, check the plan details so you understand when your validity period begins.
For many travelers, installing before departure and connecting after arrival is the smoothest option.
This gives you time to complete the setup calmly while still keeping the plan ready for your trip.
How to Install eSIM on iPhone From a QR Code in Email
If your QR code is in your email, you may be able to open it on another device and scan it with your iPhone.
This is usually the easiest method.
You can open the email on a laptop, tablet, or another phone, then scan the QR code from your iPhone.
On newer iOS versions, some users may also be able to tap and hold a QR code from a supported email or browser and select Add eSIM.
However, if this option does not appear, use the standard scanning method from another screen.
How to Install eSIM on iPhone Manually
Sometimes a QR code may not scan properly.
In that case, your eSIM provider may also give you manual installation details.
To install manually, open Settings, go to Cellular or Mobile Data, tap Add eSIM, and look for the manual entry option.
Then enter the required details exactly as provided.
Manual installation should be done carefully because even a small typing mistake can stop the eSIM from installing.
For most Jet eSIM users, QR code installation is the simpler option.
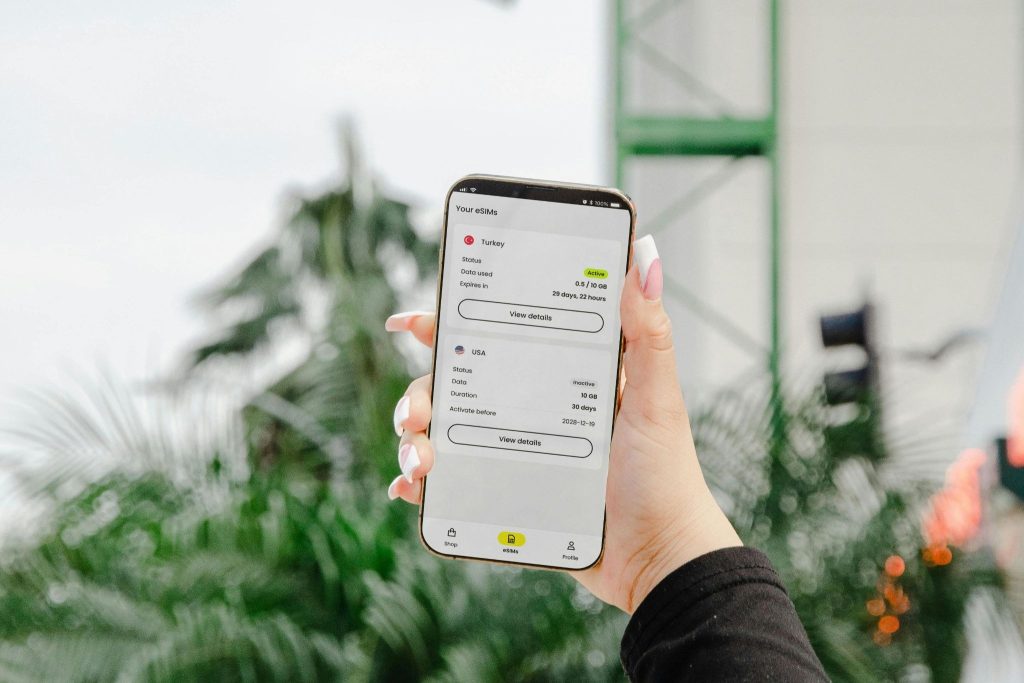
How to Check If Your eSIM Is Installed Correctly
After installation, go to Settings and open Cellular or Mobile Data.
You should see your Jet eSIM listed as one of your SIM lines.
If the eSIM appears there, it has been added to your iPhone.
You can also check whether the line is turned on.
Once you arrive at your destination and select Jet eSIM for mobile data, your iPhone should connect to a supported network if the plan is active and coverage is available.
Common iPhone eSIM Installation Problems
One common problem is trying to install an eSIM without Wi-Fi.
Make sure your iPhone has a stable internet connection before setup.
Another problem is using a locked iPhone.
If your iPhone is carrier locked, it may reject the eSIM.
Some users also scan the QR code after it has already been used. In many cases, an eSIM QR code can only be installed once.
If you delete an eSIM after installing it, you may not be able to reuse the same QR code.
That is why you should not delete your eSIM unless you are sure you no longer need it.
What to Do If Your eSIM Is Not Working
If your eSIM is installed but not working, check your settings first.
Make sure the Jet eSIM line is turned on.
Then make sure Jet eSIM is selected for mobile data.
Next, confirm that data roaming is turned on for the Jet eSIM line.
You can also turn Airplane Mode on and off, restart your iPhone, and check whether your iPhone has the latest iOS version available for your device.
If the issue continues, contact Jet eSIM support with your order details and any error message shown on your iPhone.
Can You Use iPhone eSIM and Physical SIM Together?
Yes, many iPhones allow you to use an eSIM and a physical SIM together.
This is one of the main reasons travelers like eSIMs.
You can keep your normal SIM for your regular number and use Jet eSIM for travel data.
For example, your main SIM can stay active for calls, SMS, banking alerts, and WhatsApp, while Jet eSIM gives you mobile data abroad.
This makes international travel easier because you do not have to remove your usual SIM card.
Is Jet eSIM Good for iPhone Travel Data?
Yes, Jet eSIM is a smart option for iPhone users who want simple travel data abroad.
It is built for international travelers who need mobile data without physical SIM cards or expensive roaming.
With Jet eSIM, you can choose from destination plans, install your eSIM digitally, and use it for mobile data while traveling.
Whether you are going to Europe, Dubai, France, Spain, the USA, Turkey, Japan, Thailand, or Morocco, Jet eSIM helps you stay connected more easily.
For a detailed visual setup resource, you can also view Jet eSIM’s official iPhone eSIM installation guide.
Final Thoughts
Knowing how to install eSIM on iPhone makes international travel much easier.
You do not need to buy a physical SIM card, wait at an airport counter, or depend on unsafe public Wi-Fi.
You can choose your Jet eSIM plan, install it on your iPhone, and use mobile data when you arrive at your destination.
The key is to check compatibility, use Wi-Fi during setup, scan your QR code carefully, select Jet eSIM for mobile data, and turn on data roaming for the eSIM line.
Once everything is set, your iPhone is ready for a smoother travel experience.
FAQs
How do I install eSIM on iPhone?
To install eSIM on iPhone, open Settings, go to Cellular or Mobile Data, tap Add eSIM, scan your QR code, follow the on-screen instructions, and select the eSIM for mobile data.
Do I need Wi-Fi to install an eSIM on iPhone?
Yes, in most cases you need Wi-Fi or another internet connection to install an eSIM on iPhone. It is best to install it before traveling.
Can I install Jet eSIM before my trip?
Yes, you can usually install your Jet eSIM before your trip while you have stable Wi-Fi. Always check the plan details so you know when activation begins.
Should data roaming be on for my travel eSIM?
Yes, many travel eSIMs require data roaming to be turned on for the eSIM line. Make sure roaming is enabled for Jet eSIM, not your home SIM, unless you want to use your home carrier’s roaming.
Can I keep my normal SIM while using Jet eSIM?
Yes, many iPhones support dual SIM use. You can keep your normal SIM active for calls and texts while using Jet eSIM for travel data.